Direct Actions are automated executions of DAP actions on records, triggered by specific events such as API Single Insert, record updates by users, records retrieved from the recycle bin, etc. Contrary to scheduled jobs, Direct Actions will execute each time a record modification takes place.
Set one or more triggers, define the action to apply to the records, and filter the records on Object and more.
Direct Actions can apply almost all DAP Actions; however the Assign Ownership action is only available for the Bulk Upload trigger. The Rollup action is not yet available for Direct Action.
Macros are not available to use in Direct Actions, but as Direct Actions are in a way predefined actions themselves, you only need to define the action configuration of a Direct Action once.
Direct Action use is also logged in the Audit Log, as Type: Direct Action.
View and manage your Direct Actions
In the Direct Actions Overview, you can check the details of your existing direct actions, (de)activate, edit or delete them, and create new direct actions.
- Go to DAP Setup.
- At left, click DAP Direct Action.
The Direct Action overview opens. - At the right of a direct action
- Click Info
 to view more details about the direct action, such as the last run date and the action configuration.
An important field here is "Object Trigger" on tab General. If this states "No", it means you need to create an Apex Trigger for the selected Object before you can activate the Direct Action.
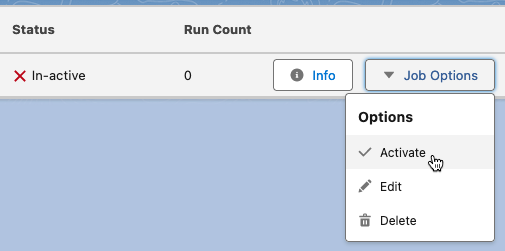
- Click Job Options
 to (de)activate, edit or delete the direct action.
You cannot change the selected Object or which Action should be used; in that case create a new direct action.
- Click Info
- At top right, click + New Direct Action
 to create a new direct action.
Create an Apex Trigger for Objects
Direct Action works out-of-the-box for Accounts, Contacts and Leads; for other objects you first need to create an Apex Trigger in Salesforce. Create one Apex Trigger per Object, that will then be used for all Direct Actions for that Object.
To create an Apex Trigger for Direct Actions:
- Go to Salesforce Setup.
- Create a new Apex Trigger: either
- Go to the Object Manager > select the Object you want to create the trigger for > Triggers > New, or
- Go to Apex Triggers > click Developer Console > File > New > Apex Trigger > enter a name and select an Object
- Enter a name if you didn't do so yet.
- Enter the after insert, after update, before delete, and after undelete trigger events.
- As the body of the trigger, enter the following lines:
plauti.dapTrigger trigg = new plauti.dapTrigger(Trigger.operationType);
    trigg.run(Trigger.new, Trigger.old);
- Check that the trigger is marked as Active.
- Save the trigger.
- Repeat for each Object where you want to use DAP Direct Action.
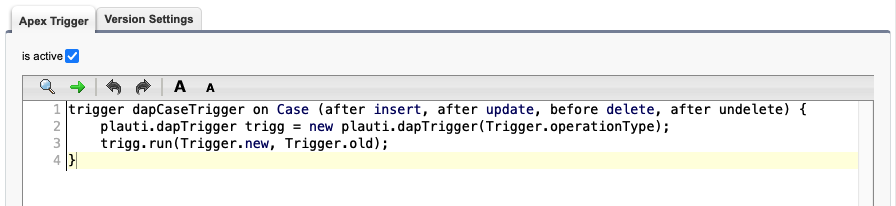
So for example, a trigger for Cases would look like this:
trigger dapCaseTrigger on Case (after insert, after update, before delete, after undelete) {
    plauti.dapTrigger trigg = new plauti.dapTrigger(Trigger.operationType);
    trigg.run(Trigger.new, Trigger.old);
}
Set up a Direct Action
 When creating a Direct Action for objects other than Accounts, Contacts or Leads, make sure you have created an Apex Trigger for the object as described above.
To set up a DAP Direct Action:
- Go to DAP Setup.
- At left, click DAP Direct Action.
The Direct Action overview opens. - At top right, click + New Direct Action

- Enter a Direct Action Name.
As the direct action might be in use for quite some time, make sure the name is descriptive of what it does. The name has a limit of 30 characters. - Select the Object that the direct action should run on.
- If desired, add a Filter to apply the direct action only to certain records of the object.
- Select one or more Triggers.
Each time a record of the selected object is created or modified by way of this trigger, the action (to be selected in the next step) will be applied to that record.
Note that the 'Record Delete' trigger can only be used in combination with the 'Run a Flow' and 'Run an Apex Class' actions.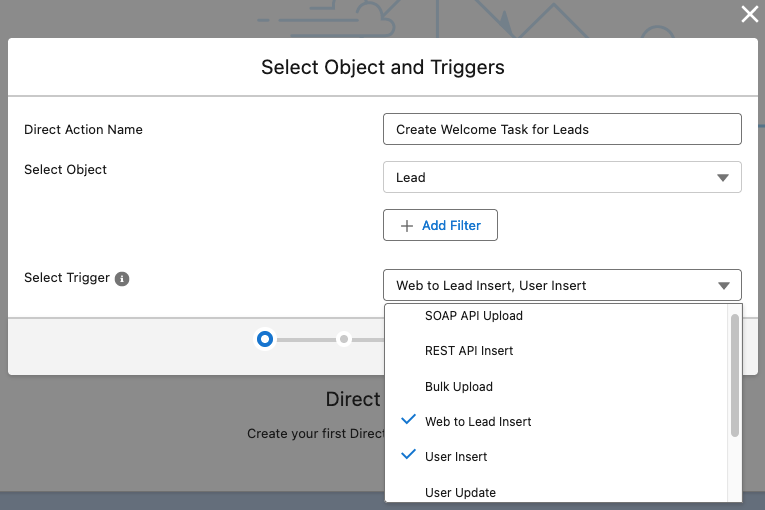
- Click Next.
- Select an Action to apply to the records and click Next.
Note that the 'Assign Ownership' action can only be used in combination with the 'Bulk Upload' trigger. -
Configure the action and click Next.
See the action descriptions in The DAP Actions for more information on how to configure each action. - On the Summary page, review the direct action settings and click Create.
The Direct Action you just created now appears in the Direct Action Overview.
- To start using the Direct Action, at right, click Job Options > Activate.
Once activated, the configured action will be applied each time a record is created or updated by means of the selected trigger.
Direct Action, Scheduled Job, or Macro?
Direct Actions, Scheduled Jobs and Macros are all used to execute a predefined action multiple times.
- Use a Direct Action to apply an action to one or more records whenever they are created, updated or (un)deleted, without any user interference.
- Use a Scheduled Job to run an action on a static or dynamic selection of records repeatedly without any user interference, following a set schedule.
- Use a Macro to run an identical action whenever you want to run it; to let several users run the same action with the exact same configuration; or to let users with limited rights perform one specific action without giving them access to the full action.
